Donating Plasma Center Guide for First-Time Donors and Regular Visits
Choosing a donating plasma center can feel straightforward until you start thinking about the details. Is the process safe? How long will you be there? What do you need to bring? What gets people deferred? And if you plan to donate more than once, how do you make it a routine that doesn’t leave you wiped out?
Plasma donation is highly structured and routine, but your experience depends a lot on preparation and on the center’s workflow. This guide explains what happens at a donating plasma center, how to prepare, what to expect during your visit, and how to recover well afterward.
What Plasma Is and Why Donation Matters
Plasma is the liquid part of your blood. It carries proteins and antibodies that support clotting and immune function. Donated plasma is used to create therapies for people with certain immune deficiencies, bleeding disorders, and other serious medical conditions. Many of those therapies require ongoing plasma supply, which is why consistent donors matter.
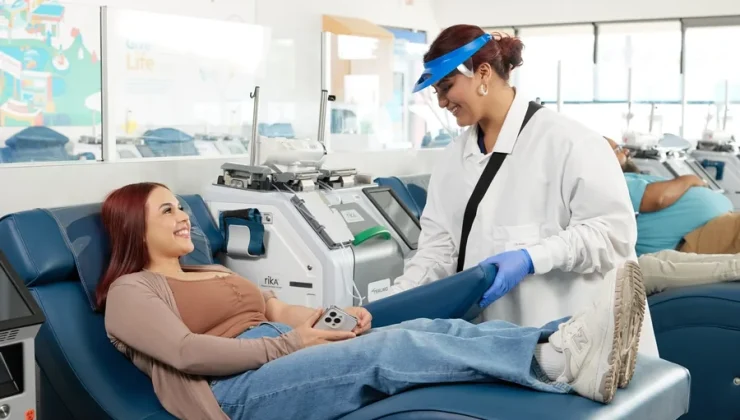
A donating plasma center collects plasma through a process that separates plasma from other blood components, then returns the red blood cells and platelets to you.
How a Donating Plasma Center Visit Works
Even if centers vary in small ways, the overall process is usually similar.
Step 1: Check-in and verification
You’ll confirm your identity and complete required paperwork or questionnaires. First-time donors usually go through a longer intake process.
Step 2: Health screening
Most donating plasma centers do a basic screening before every donation. This often includes:
- Vital signs (blood pressure, pulse, temperature)
- Weight check
- A finger-stick test to check things like protein levels and hemoglobin
This is the step that determines whether you can donate that day.
Step 3: The donation process
Once cleared, you’ll be seated in a donor chair. A trained staff member inserts a needle, typically in your arm. A machine draws blood, separates plasma, then returns the rest to you in cycles.
Step 4: Wrap-up and bandaging
When the collection amount is reached, the needle is removed and the site is bandaged. Many centers suggest you rest briefly, drink water, and eat something afterward.
How Long It Takes
Time varies, but the biggest difference is usually between first-time and returning donors.
- First visit: often longer due to registration, history review, and extra checks
- Return visits: usually faster since your information is already in the system
- Donation speed: depends on hydration, vein access, and how your body responds
Your first appointment at a donating plasma center is the best one to schedule with extra time, just in case.
What to Bring to a Donating Plasma Center
Requirements vary, but commonly you’ll need:
- A government-issued photo ID
- Any additional documents requested (some centers require proof of address)
- Comfortable clothing with sleeves that roll up easily
It’s also smart to bring:
- Water
- A small snack for after, if allowed
- Headphones or something to do while you’re sitting
If you’re unsure about documentation, call ahead so you don’t waste a trip.
Eligibility Basics and Why People Get Deferred
Plasma donation centers follow strict eligibility and safety rules. While requirements vary by location, most centers look at age, weight, general health, and screening results.
Common reasons people get deferred include:
- Low hemoglobin
- Low protein levels
- Dehydration
- Recent illness or fever
- Certain medications
- Recent tattoos or piercings (rules can vary)
- High blood pressure or abnormal pulse at screening
- Difficulty finding a suitable vein
Deferrals are frustrating, but they’re usually about safety. If you’ve been deferred, ask what triggered it and what you can do differently next time.
How to Prepare for a Smooth Donation
Prep is the biggest predictor of whether your visit feels easy or rough.
Hydrate the day before
Hydration helps veins stay accessible and can improve flow during the donation. Start the day before, not just right before you arrive.
Eat a protein-rich meal
Plasma contains proteins, so it helps to eat well beforehand. Aim for lean protein and balanced carbs, like:
- Eggs, chicken, fish, tofu, beans
- Rice, oats, whole grains
- Fruits and vegetables
Avoid very greasy meals right before donating. They can make you feel sluggish.
Get normal sleep
Being tired increases the chance of feeling lightheaded. A decent night of sleep helps more than people think.
Avoid alcohol
Alcohol dehydrates you and can make recovery feel worse.
Dress comfortably
Wear sleeves that roll up easily. Some donors also bring a light jacket because return cycles can feel chilly.
What It Feels Like During Donation
Most people say the needle pinch is the most noticeable part. After that, it’s mostly just sitting still.
You may notice:
- A cool sensation during return cycles
- Mild pressure in the arm if you tense up
If you feel tingling, dizziness, nausea, or strong discomfort, tell the staff right away. They can adjust things, and it’s common for first-time donors to need small tweaks.
Tips if You’re Nervous About Needles
Needle anxiety is common. These strategies help:
- Look away during insertion
- Use music or a podcast for distraction
- Keep your shoulder and hand relaxed
- Slow your breathing
- Tell staff you’re nervous so they can guide you calmly
If you’ve fainted during blood draws before, mention it during screening. They can help you donate safely, often by positioning you differently.
After Donation Recovery
Most people feel fine afterward, especially if they prepped well. Still, a few habits help you bounce back faster.
Drink fluids
Hydrate for the rest of the day. Headaches and fatigue after donating are often dehydration-related.
Eat something balanced
A meal or snack with protein helps you feel steady. Yogurt, eggs, beans, or a normal meal works well.
Take it easy with your donation arm
Avoid heavy lifting for a few hours. It can reduce soreness and bruising.
Watch the needle site
A small bruise can happen. If you notice swelling, warmth, worsening pain, or spreading redness, get medical advice.
How to Make Plasma Donation a Sustainable Routine
If you plan to donate regularly, consistency matters more than intensity.
- Stay hydrated daily, not just on donation days
- Eat enough protein throughout the week
- Don’t donate when you’re run down
- Keep your schedule predictable when possible
- Pay attention to how your body responds and take breaks if needed
The best long-term donors are usually the ones who treat donation like a health routine.
Conclusion
A donating plasma center visit is usually straightforward once you know the steps. The keys to a smoother experience are simple: hydrate early, eat a balanced meal with protein, sleep normally, and give yourself a calm buffer afterward. If you’re nervous, speak up. Staff are used to helping first-time donors feel comfortable.
With the right preparation, plasma donation can become a predictable, manageable routine that fits into your week and helps support therapies people rely on every day.